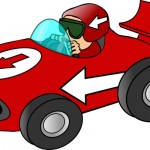
car1 – double click to see animation
We will be making a Flash Animation as an aid to teaching elementary students.
As a preparation for this we will go over some Flash Basics.
Today we’ll do MOTION TWEEN – using this you can move pictures or drawings (SYMBOLS) across the screen.
First we’ll make a racing car go across the finish line in a race.
Download the car image
Save this car image to a folder on your Home drive
Now open FLASH
Choose new Flash File – actionscript2
File – import – to library (choose the car image)
Change the name of ‘layer1’ to ‘Race Finish’
Use the Pencil tool to draw 2 lines (like you see in the animation)
Draw the two Finish lines and fill with yellow
Now click on FRAME 100
Insert – timeline – keyframe
(Frames 1-100 should now all be gray)
Insert – timeline – layer
Rename this layer ‘Car1’
Drag the Car from the library to the space to the right of the white box (stage)
It is a bit big so use the TRANSFORM tool to resize it (3rd tool down on left of screen)
Click on the menu MODIFY – Convert to symbol (Movie Symbol)
Name it Car1
Now click on frame 100
Insert – timeline – keyrame
Drag the car all the way across the screen – off to the stage on the left
Click on any gray frame on the car layer
Insert timeline – Create motion tween
Now try it by clicking Control Play (or Control Test movie)
If you want to make the Car go faster click on the Frames per second (12 fps) and change it to 48
NOW – in PAIRS design your own simple animation on PAPER using the Car image
Split the paper into 6 boxes – each box represents 20 frames
REMEMBER
You can draw a background
You can draw things which you can then move (after converting to symbol)
You could have 2 instances of the car on the screen at the same time and make them race – or crash!
Homework
Go to the Flash Animation 09 Winners Gallery
Choose ONE animation and be prepared to explain it to everyone next time – why you like it – what’s good about it.

